Arrow Class
manimlib.mobject.geometry.Arrow(self, *args, **kwargs)object > Container > Mobject > VMobject > TipableVMobject > Line > Arrow
Create a line with an arrow on one side.
Like Line class, you can also take both endpoints as input and create a arrow with them.
    CONFIG = {
        "stroke_width": 6,
        "buff": MED_SMALL_BUFF,
        "max_tip_length_to_length_ratio": 0.25,
        "max_stroke_width_to_length_ratio": 5,
        "preserve_tip_size_when_scaling": True,
    }
Parameters: *args
To inherit Line, you can use start and end values, which are parameters used in Line.
- start=LEFT: starting point of the line
- end=RIGHT: ending point of the line
Parameters: **kwargs
CONFIG values of Arrow and Line/TipableVMobject/VMobject/Mobject
Freuenedly used arguments are:
- stroke_color: color of the line. It's same effect with the 'color' argument
The parameters to adjust the size of the arrow and arrowhead are buff and tip_length.
- buff:  Create predefined size arrows. The default is MED_SMALL_BUFF=0.25
- tip_length: Determine the size of the arrowhead. DEFAULT_ARROW_TIP_LENGTH=0.35 by default
The buff can have a value between [0,1], and the closer to 1, the smaller the size of the arrow is generated.
So you can use SMALL_BUFF(=0.1), MED_SMALL_BUFF(=0.25), and MED_LARGE_BUFF(=0.5) to create an arrow of the promised size.
Actually, since Arrow is also an Mobject, it can be scaled using the scale method, and changing the size through this is intuitive. Below is an example of using the buff and scale to change the size of the arrows.
In the example code, to prevent the code from being written too long within the construct method, the part that creates the arrow is separated into separate methods. This simplifies the code and makes it easier to read.
    buff_changed = Arrow_Buff.get_buff_changed()
    scale_changed = Arrow_Buff.get_scale_changed()
In order to display the created objects one after another on the screen, it is necessary to place sub-objects one after another by using the 'arrange' method. Here it is placed from top to bottom.
buff_changed.arrange(DOWN, center=False, aligned_edge=LEFT)
class Arrow_Buff(Scene):
    def construct(self):
        #1. Creation
        buff_changed = Arrow_Buff.get_buff_changed()
        scale_changed = Arrow_Buff.get_scale_changed()

        #2. Positioning
        buff_changed.to_corner(UL, buff=1) # move to upper side with buffer

        buff_changed.arrange(DOWN, center=False, aligned_edge=LEFT)

        scale_changed.to_edge(UP, buff=1)
        scale_changed.arrange(DOWN, center=False, aligned_edge=LEFT)

        #3. Show
        self.add(buff_changed, scale_changed)
        self.wait()

    def get_scale_changed():
    	# up to [0,2.1) increse stepwise 0.2
        n=np.arange(0,2.1,0.2)

        group = VGroup()
        for k in n:
            k = round(k,1) # round up
            arrow = Arrow()
            arrow.scale(k) # set arrow's size as k
            text = Text("scale:"+str(k),size=0.2,stroke_width=0)

            text.next_to(arrow,RIGHT)  #화살표 오른편에 글자 배치
            group.add(VGroup(arrow,text))  #arrow와 text를 VGroup으로 한 번 묶고나서 다시 이것을 group.add() 한 것에 유의
        return group

    def get_buff_changed():
        buff_size = [0,SMALL_BUFF,MED_SMALL_BUFF,MED_LARGE_BUFF]
        texts = ["0","SMALL_BUFF","MED_SMALL_BUFF","MED_LARGE_BUFF"]

        group = VGroup()
        for t, s in zip(texts,buff_size):
            arrow = Arrow(buff=s)
            text = Text(t, size=0.2, stroke_width=0)

            text.next_to(arrow,RIGHT)
            group.add(VGroup(arrow,text))
        return group
You can adjust the size of the arrowhead by changing the 'tip_length' value. The default value is DEFAULT_ARROW_TIP_LENGTH=0.35, which creates a larger arrowhead.
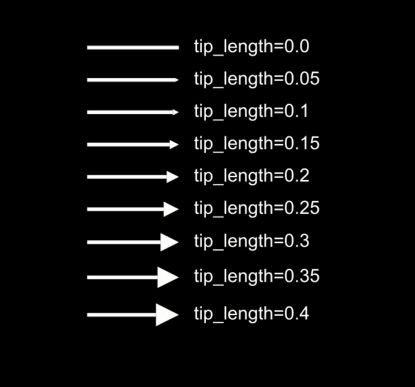
class Arrow_TipLength(Scene):
    def construct(self):
        size = np.arange(0,0.41,0.05)

        g = VGroup()
        for s in size:
            s = round(s,2)
            arrow = Arrow(tip_length=s)
            text = Text("tip_length="+str(s), size=0.3, stroke_width=0)
            text.next_to(arrow,RIGHT)
            g.add(VGroup(arrow,text))

        g.to_edge(UP,buff=1)
        g.arrange(DOWN, aligned_edge=LEFT)

        self.add(g)
        self.wait()
You can also adjust the arrow size by manually adjusting the Arrow.tip variable rather than the CONFIG parameter.
    arrow = Arrow()
    arrow.tip.scale(0.75)   # the size of arrowhead
    arrow.tip.set_stroke(WHITE, width=5)  # outline of the arrowhead: white and width=5
    arrow.tip.set_fill(opacity=0)   # transparent inside the arrowhead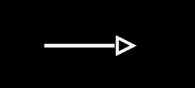
DoubleArrow class
manimlib.mobject.geometry.DoubleArrow(self, *args, **kwargs)object > Container > Mobject > VMobject > TipableVMobject > Line > Arrow > DoubleArrow
Create a line with arrows on both sides. Like Line, you can also take both endpoints as input and create doubled-arrow with them.
Parameters: *args
    To inherit Line, you can use the start and end values used in Line (Line> Arrow> DoubleArrow)
    - start=LEFT: starting point of the line
    - end=RIGHT: ending point of the line

Parameters: **kwargs
    CONFIG values of Arrow and Line/TipableVMobject/VMobject/Mobject의 CONFIG
    There is no CONFIG value only for DoubleArrow class

    Frequently used values are:
    - stroke_color: line color. it's possible to use 'color' variable
    - stroke_width: line thickness. default value is 6 (different with Arrow's default value)
Arrows at either end of a line can be created using the DoublArrow class. The parameters used are the same as Arrow, and there is no CONFIG value for DoubleArrow.
    # Create a 5 MUnit two-way arrow from left to right
    d_arrow = DoubleArrow(LEFT,RIGHT)
    d_arrow.set_length(5)
Vector class
manimlib.mobject.geometry.Vector(self, direction=RIGHT, **kwargs)object > Container > Mobject > VMobject > TipableVMobject > Line > Arrow > Vector
Create an arrow in the given direction based on the origin. This can be used like a vector in mathematics.
vector = Vector(UR)  # create a vector object with '(0,0) -> (1,1)' direction
vector = Vector(np.array([-2,1]))  # direction is '(0,0) -> (-2,1)'
CONFIG = {
"buff": 0,
}Parameters: direction=RIGHT
Arrow indicating the direction of the vector, from the origin to the direction.
It is also possible to input 2D coordinates,
in which case it is converted to 3D coordinates with z=0 internally.
Parameters: **kwargs
CONFIG values of Vector and Arrow/Line/TipableVMobject/VMobject/Mobject
Frequently used values are:
- stroke_color: line color. it's same to set with 'color' variable
- stroke_width: line thickness. default value is 6If we express the vector in mathematics geometrically, it can be said to be an arrow to a certain point based on the origin.
The Vector class is the implementation of this geometric representation. If you give the value of a point on the screen as an argument, an arrow is created from the origin to that point.
Methods for calculating vectors
In Manim, methods for calculating vectors are defined in the Line class. Therefore, these methods can be used in DashedLine and Arrow as well as the Vector class.
The biggest advantage when creating animations using Manim is to create images or videos that can not be made by humans using general graph editing programs or video editing programs, using mathematical formulas.
Therefore, you need to become familiar with the methods for vector calculation.
get_vector
manimlib.mobject.geometry.Line.get_vector(self)Returns:
Vector value for the line. it's an array of numpyThe 'get_vector' method return an array value for the line
The vector value is calculated by subtracting the starting point coordinates from the end points of the line, as shown below. Therefore, the internal code of get_vector is return self.get_end()-self.get_start().

What is returned by the get_vector method is the location value of that vector. In other words, it is a value in the form of an array of numpy. To bring it back to the screen, we need to make it a Vector object.
        c = Arrow(a,b, buff=0)
        vector_c = Vector(c.get_vector())  # create a Vector object for the arrow
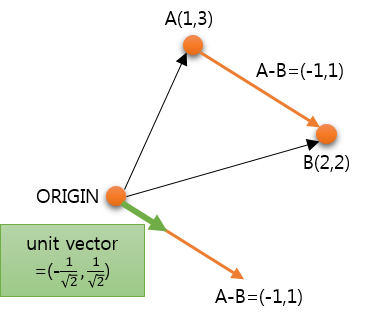
If you think about it from a geometric point of view, the vector value of a line or arrow is a translation of that line to the origin. The vector value of the line ([1,3], [2,2]) is (-1,1).
The code to draw it on the screen is as follows.
    def get_vector_test(self):
        plane = NumberPlane()
        a = np.array([1,3,0])
        b = np.array([2,2,0])

        vector_a = Vector(a)
        vector_b = Vector(b)

        c = Arrow(a,b, buff=0)
        vector_c = Vector(c.get_vector())

        self.add(plane)
        self.add(vector_a, vector_b, c)
        self.play(ShowCreation(vector_c))

        self.wait()
get_unit_vector
manimlib.mobject.geometry.Line.get_unit_vector(self)Returns:
Unit vector value for the line. it's an array of numpyFind the unit vector of a line. The returned value is a position value representing a unit vector, in the form of a numpy array.
The unit vector is the value obtained by taking the line vector and dividing the vector by the size of the vector.
get_angle
manimlib.mobject.geometry.Line.get_angle(self)Returns: The angle from the x-axis to the line.
The value increases as it increases in the counterclockwise direction
based on the x-axis, and decreases in the clockwise direction.
Unit is radians
Find the angle of the line's vector.
If you think of it as a geometric image, it is the angle measured from the x-axis to the line after moving the line to the origin.
The angle is 0 (zero) on the x-axis, increases counterclockwise to 180 degrees, and then increases from -180 degrees to converge to 0.
It is convenient to think of it as positive (+) in the counterclockwise direction and negative (-) in the clockwise direction based on the x-axis.

The code below is an animation that geometrically expresses the get_angle value for a line ([1,3], [2,2]).
Get the Vector for the line and show that the angle from the x-axis to this Vector is the get_angle() value of the line.
I used NumberPlane to draw a grid on the screen background,
plane = NumberPlane()
MovingCameraScene was used to enlarge and show the part where the angle is displayed. To enlarge the screen, simply set the camera_frame.scale value to a value less than 1.
self.play(self.camera_frame.scale, 0.7,)
The full source code is,
class VectorTest(MovingCameraScene):
    def construct(self):
        self.get_angle_test()

    def get_angle_test(self):
        self.setup() #MovingCameraScene's setup

        plane = NumberPlane()
        a = np.array([1, 3, 0])
        b = np.array([2, 2, 0])

        vector_a = Vector(a)
        vector_b = Vector(b)

        c = Arrow(a, b, buff=0, color=RED)
        vector_c = Vector(c.get_vector(), color=RED)

        angle = c.get_angle()
        arc = Arc(0, angle, radius=0.5)
        angle_text = DecimalNumber(angle / DEGREES).next_to(arc,RIGHT)

        #play
        self.add(plane,c)
        self.play(TransformFromCopy(c,vector_c))

        self.play(
            Succession(
                ShowCreation(arc),
                ShowCreation(angle_text),
            ),
        )
        self.play(self.camera_frame.scale, 0.7,)

        self.wait(3)
Generated video clip is,
get_slope
manimlib.mobject.geometry.Line.get_slope(self)Returns:
The slope of the line'get_slope' method used to fine the slope of a line.
slope = line.get_slope()The slope of the line is y/x. The actual implementation logic in the library is obtained using np.tan(self.get_angle()), where the tan value for the angle of the line segment is y/x.
set_angle
manimlib.mobject.geometry.Line.set_angle(self, angle)Rotate the line to a given angle. The unit of angle is radians.
If you want to change the general angle value to radians, you can do 'angle * 2 PI / 360', and since it is defined as
DEGREES = TAU / 360 = 2 PI / 360,
you can express it as 'angle * DEGREES'.
So, to make the line segment 45 degrees,
line.set_angle(45 * DEGREES)
Parameters: angle
  Angle value to be set.
The actual implementation is to rotate (target angle-current angle) relative to the starting point of the line.
If the current angle is called 'a' and the target angle is 'x', then the angle to be rotated is r = x-a.

    def set_angle(self, angle):
        self.rotate(
            angle - self.get_angle(),
            about_point=self.get_start(),
        )
Next: [05-3-D] Polygon series(1/2): Polygon/Triangle/ArrowTip
[05-3-D] Polygon series(1/2): Polygon/Triangle/ArrowTip
In this page, we will learn how to create polygon-like shapes. The top class is Ploygon, and general polygons can be created using Ploygon, such as Rectangle and Triangle. Polygon class object > Con..
infograph.tistory.com
Go To: [99] Table of Contents
'Programming > Manim Lectures' 카테고리의 다른 글
| [05-3-E] Polygon series(2/2): Rectangle/Square/Rounded Rectangle (0) | 2020.06.07 |
|---|---|
| [05-3-D] Polygon series(1/2): Polygon/Triangle/ArrowTip (0) | 2020.06.07 |
| [05-3-B] Line series(1/2): Line/DashedLine (0) | 2020.06.07 |
| [05-3-A] Common Methods (0) | 2020.06.07 |
| [05-3]Shapes (0) | 2020.06.07 |


